Learning how to build a model train layout is a lot easier than it looks. Follow these step-by-step directions to easily get started building a model train layout of your dreams.
If you’re able to follow step by step directions then you’ll know exactly the order of steps that are needed achieve your outcome. This will save you time, money and lots of frustration. The fact is that many model train enthusiasts never get started because they don’t know what’s the first step.
Sometimes you may feel overwhelmed about all of the things seemingly needed to build a model train layout. Other times it can feel daunting and out of your budget due to the potential costs of building a layout. All of these worries can be combated with some proper upfront planning.
Well rest assured that in this step-by-step article, you will learn each step by watching an actual model railroad get built from start to finish. This includes all of the major aspects such as choosing the track plan, building the benchwork, laying down the track and even wiring. At the end of photo assisted directions, you’ll see a complete model railroad.
Step 1 – Choose Your Track Plan
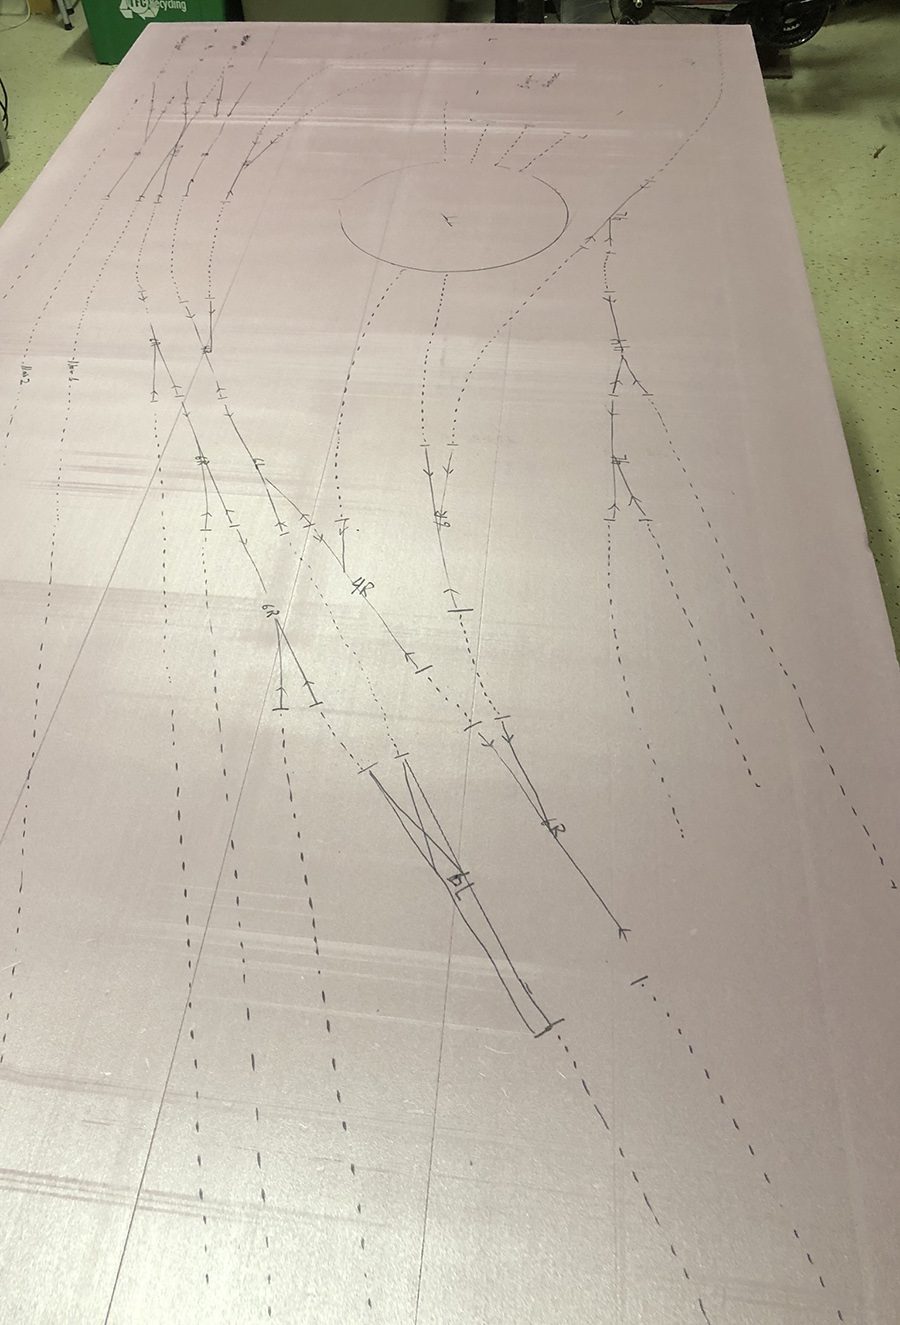
The first step in building a model train layout is choosing a track plan. Your choice of track plan design is dependent on the amount of space that you have available. The second dependency is your total model railroading budget and third is how much enjoyment that you’re expecting from the completed layout.
This particular track plan contains several different elements such as a turntable for easy turning around of the trains. Plus it also includes turnouts for industries and sidings that end the track.
There’s a few different options when it comes to choosing a track plan:
Step 2 – Building Benchwork
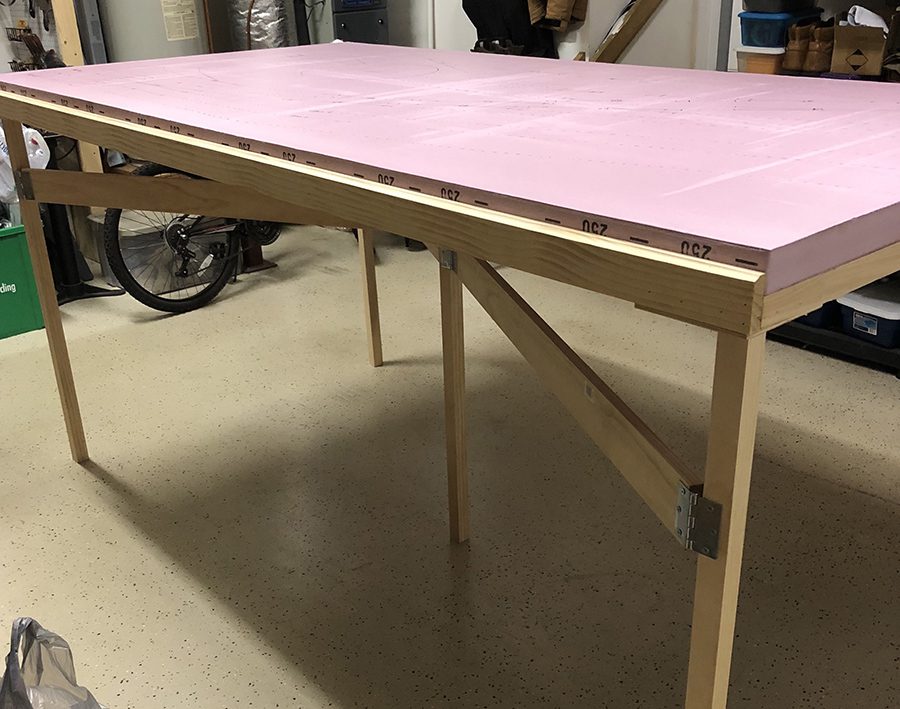
Once you have a track plan in mind, it’s time to get to work on your benchwork. The size of the benchwork will be based on your track plan dimensions. Once you start to lay track, you’ll quickly realize if the curves fit on the surface of your bench.
If the trackwork doesn’t fit precisely then your trains will not move correctly. This is sure-fire way for constant derailments and an overall unpleasant experience. Remember that lacking bench space will not allow you to alter anything.
Building the benchwork for the example above, requires several 1 x 4 inch square stocks and hinges. Also, the legs of the benchwork use removable cross bracing to make it more rigid. This also gives it the ability to become portable without the risk of collapsing when moved.
Some of the tools needed for constructing the benchwork include clamps to connect the modules together. Also, some basic carriage bolts and wing nuts will ensure that it’s stable. The stability of the benchwork will dictate if it can hold the weight of the actual layout.
Tools for Beginning Your Model Railroad
Investing in high-quality tools is important as cheap tools tend to break or not work very well. Quality tools can last you a lifetime and will pay for themselves, in the long run.
- Screwdrivers
- Crosscut Saw
- General Purpose Saw
- Cordless Drill
- Multi-meter
- Airbrushes
Step 3 – Laying the Trackwork
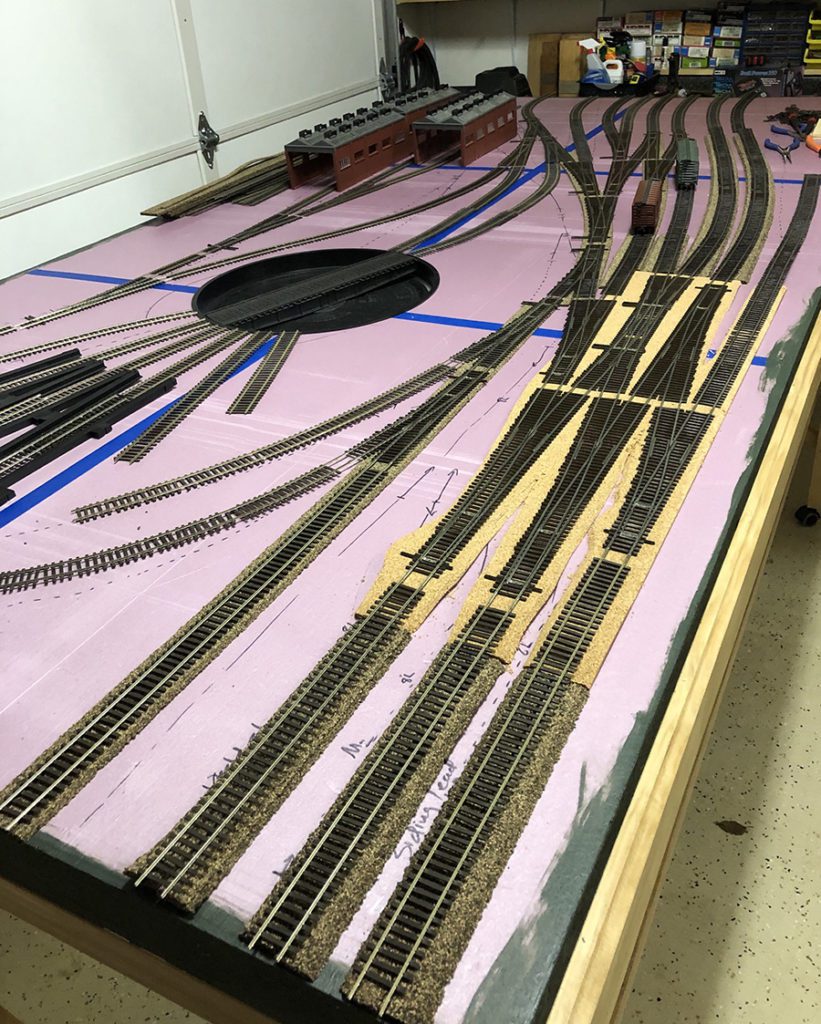
The next step is when the actual work begins in building your model train layout. You need to mark the track path on the board (you can even use a track planning software for this) to use as a guide.
Laying model railroad track is perhaps the most fun part of the hobby, right next to choosing locomotives and building scenery. Once you start laying track, you begin to see how the trains will move across the layout along with the curves and gradients.
It’s important to have the track plan in mind before building benchwork because once you start to lay track it will become very evident if the curves fit on the surface of your bench. If they don’t fit precisely then your trains will not move correctly, and it is a sure-fire way for constant derailments and an overall unpleasant experience. Remember that lacking bench space will not allow you to alter anything
Model Railroad Roadbed
There is a few different kinds of model railroad roadbed, some of the more popular ones include homasote, which is a great ground defining material that keeps the trains very quiet. Homoabed is another material that can be used for model railroad roadbeds. Sometimes they have curves cut into them, which make them ideal for bedding around curves. Another type is called track bed made by Woodland Scenic. By far the most popular is using the cork model train roadbed as it’s the most readily available and most used.
Track laying and ballasting require you to work closely into the baseboard so make sure you finish this step before you add the scenery. Make sure you clean as you go because the worst thing that could happen is for your train to get stuck because of excess glue and other items. Laying the trackwork is one of the most important steps because without clean trackwork your locomotives have the potential to derail.
Step 4 – Wiring the Model Train Layout
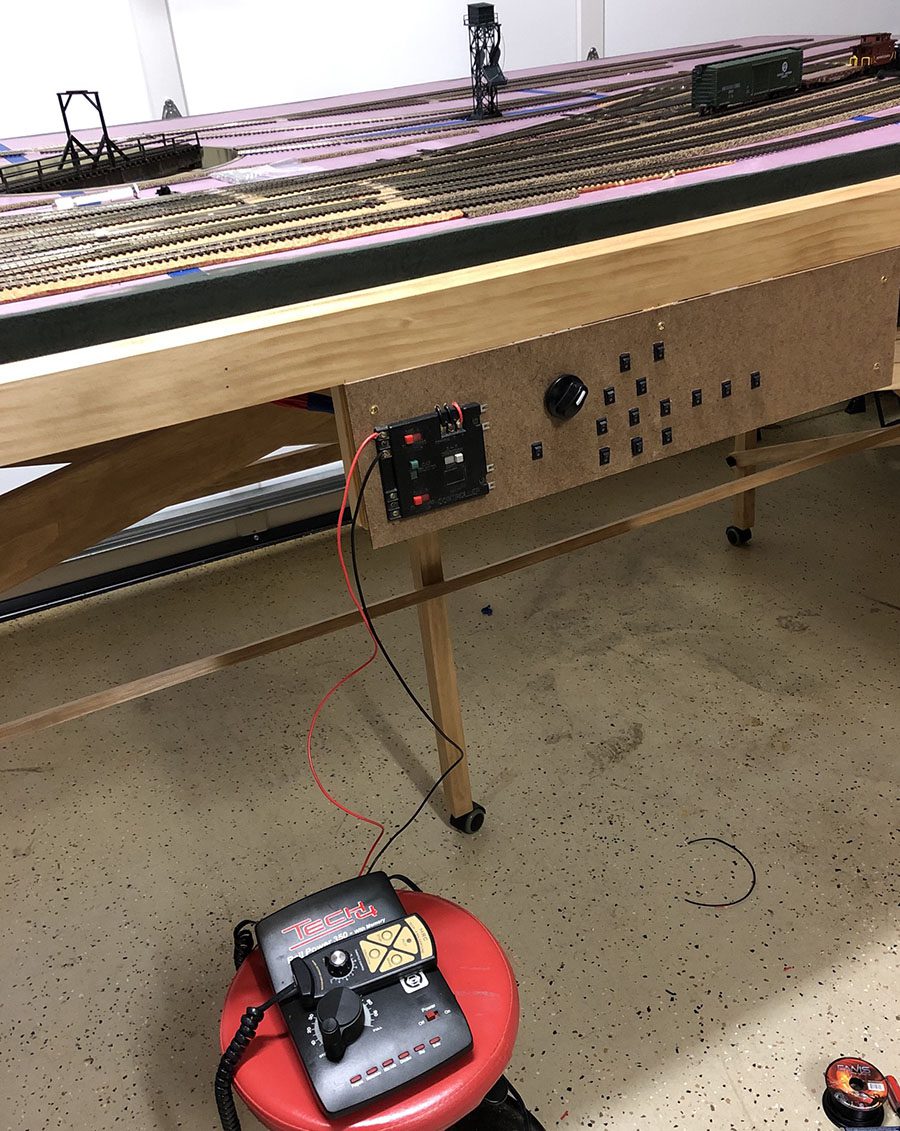
Wiring the model train layout is one of the most appealing parts of this hobby. The locomotives and the scenery are nice to look at but it’s the wiring that makes these elements work.
The first rule of thumb when wiring a model railroad is to pay close attention to polarity. The rail of the track serves as a long wire that spans the entire layout. These wires carry the current that allow the train and other elements to work by design.
The best approach to wiring your model train layout is to have the positive on the right hand rail as the train is moving forward. The wire that is connected to the positive terminal will serve as the positive side of the entire layout. On the other hand, wires connected to the negative terminal will represent the negative rail for the entire layout.
Without this polarity, your track should short circuit. In some cases, it won’t work as you designed it to be or, worse, it could get damaged.
DCC Wiring
The best type of wiring is done for digital command control or DCC wiring. When deciding what to use, keep in mind that DC is a lot cheaper than using DCC. Soldering is a big part of the process. There are several different manufacturers of DCC control systems available, which makes it somewhat difficult to decide which one is right for you. This decision will most likely depend on the size of your layout, the ease of use, the expense, and whether the system is expandable
Step 5 – Adding Model Railroading Scenery
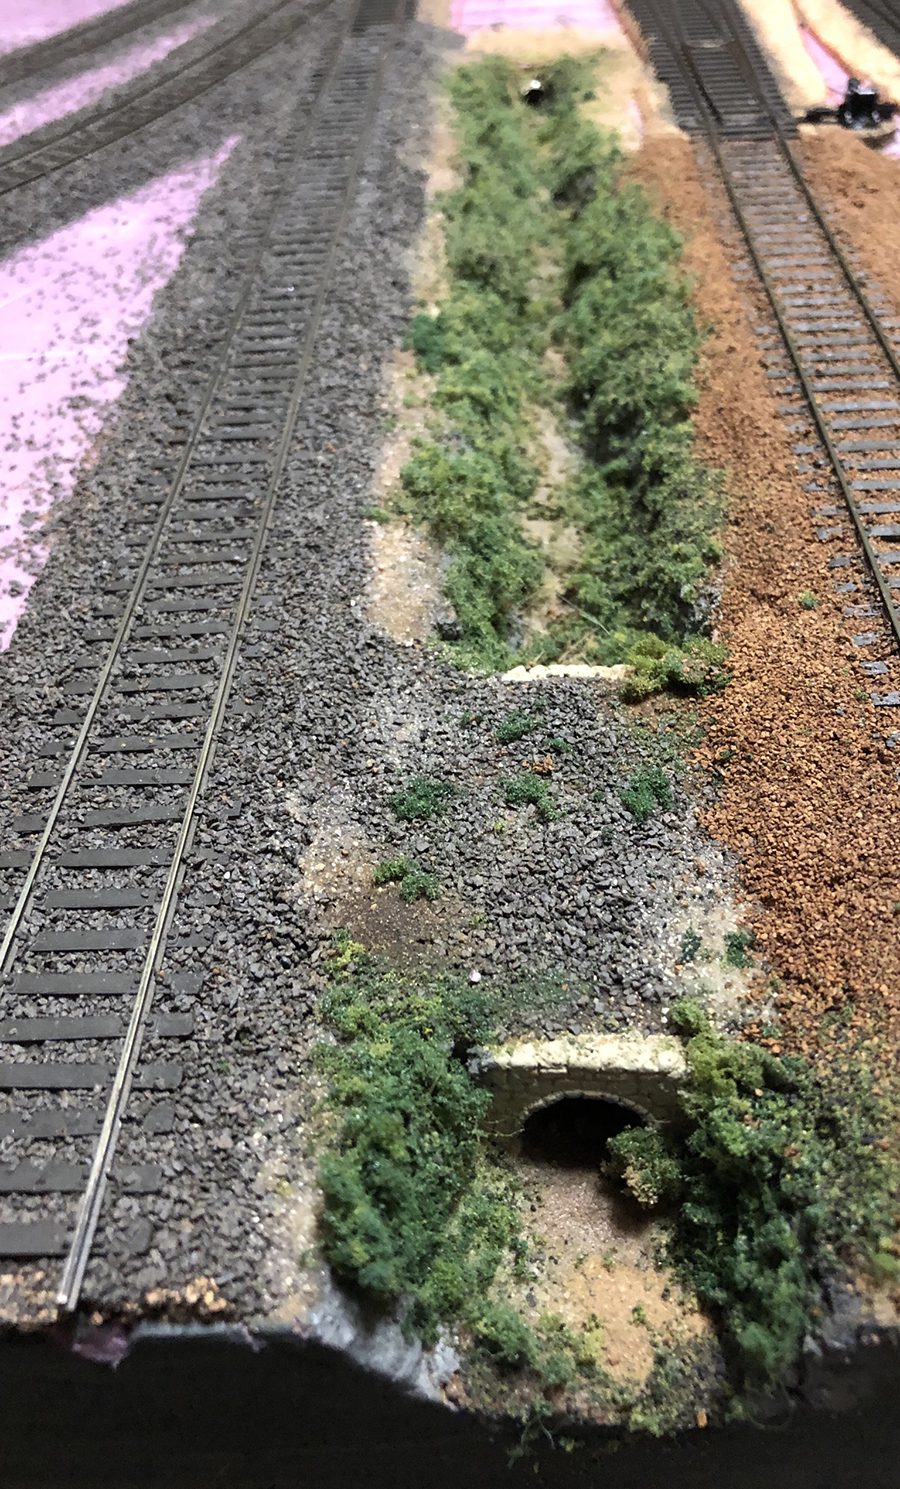
Developing model train scenery must start with the process of making terrain. This would include not only mountains, valleys, cliffs, riverbeds, and gorges, but also meadows, fields, undulating landscapes and any other landform that you can imagine.
Adding scenery to the model train layout is where you can unleash our artistic and creative side. Choose a locale or theme that you want and gather the supplies you need. Even if it’s a product of your imagination, the elements in your scenery need to make sense. Some of the elements you can incorporate to the model train layout are the rock formations, buildings, terrains, tunnels, roads, trees, bridges, and water.
For a more realistic layout, you can incorporate other details like signposts, fences, animals, and telephone poles.
How to Build a Model Train Layout That’s Ready to be Used
In this article named “how to build a model train layout” – you just learned every single critical component of building a model train layout from start to finish. Now use the free guides below to even further your knowledge and skills!
- Top Rated Track Plans for Model Train Beginners
- The ONLY Two Things EVERY Model Train Beginner Must Know..!
- 5 Tips to Avoid Derailments, Erratic Stops, and Costly Building Mistakes
- DCC Wiring for Beginners
- Choosing the Right Scale with Limited Space
- The ONLY Time Tested Way to Lay Model Railroad Track
- Installing Model Train Buildings and Roads
- Model Train Layout Sharing w/ Grandkids (Open Letter)
- How to Build Model Train Hills & Trees Perfectly Every Time
- Top 3 Costly Model Train Mistakes & How to Avoid Them
- How to Avoid Costly Mistakes When Building Model Railroad Benchwork